
Toyota Sewing Machine User Manual: An Overview
Discover the comprehensive guide to your Toyota sewing machine, offering detailed instructions and troubleshooting tips. Explore features,
maintenance, and safety guidelines for optimal performance and longevity.
Toyota sewing machines represent a legacy of precision engineering and reliability, mirroring the company’s renowned automotive standards. For decades, these machines have empowered both novice and experienced sewers with consistent performance and innovative features. This manual serves as your guide to unlocking the full potential of your Toyota sewing machine.
Whether you’re embarking on simple repairs or complex quilting projects, understanding your machine’s capabilities is crucial. This overview will familiarize you with the core components, operational procedures, and maintenance practices essential for achieving professional-quality results. Prepare to embark on a rewarding sewing journey!
Historical Context of Toyota Sewing Machines
Toyota’s entry into the sewing machine market stemmed from the post-World War II reconstruction efforts in Japan. Initially, the company, then known as Toyoda Automatic Loom Works, sought to diversify beyond textile machinery. This led to the development of the first Toyota sewing machine in 1946, leveraging their existing mechanical expertise.
Early models focused on domestic use, quickly gaining popularity for their durability and innovative automatic features. Over time, Toyota sewing machines evolved, incorporating advanced technologies and catering to a wider range of sewing needs. This commitment to quality and innovation continues today, shaping the machines available to users.

Understanding Your Toyota Sewing Machine Model
Locate your model number for specific guidance. Familiarize yourself with key components – from the needle to the stitch dial – for efficient operation and maintenance.
Identifying Your Specific Model Number
Your Toyota sewing machine’s model number is crucial for accessing the correct resources, including specific manuals, parts diagrams, and troubleshooting advice. This unique identifier allows you to pinpoint the exact features and capabilities of your machine. Typically, the model number is located on a sticker or plate affixed to the machine itself.
Common locations include the underside of the machine base, the back panel, or near the bobbin area. Carefully inspect these areas. Once found, record the complete model number accurately. Having this information readily available will streamline any future maintenance, repair, or support inquiries you may have regarding your Toyota sewing machine.
Key Components and Their Functions
Understanding the core components of your Toyota sewing machine is essential for effective operation and maintenance. The needle, driven by the machine, creates the stitches. The presser foot holds fabric firmly during sewing. The bobbin, housed below, provides the lower thread.
The stitch selection dial allows you to choose various stitch patterns. The feed dogs move the fabric under the needle. Familiarize yourself with each part’s location and function. Regular inspection and proper care of these components ensure smooth, reliable sewing performance and extend the life of your machine.
Needle and Presser Foot Mechanisms
The needle mechanism precisely drives the needle up and down, creating stitches as it interlocks with the bobbin thread. Correct needle type is crucial for fabric compatibility. The presser foot mechanism applies consistent pressure, ensuring even fabric feed. Adjusting presser foot pressure is vital for delicate or thick materials.
Proper alignment between the needle and presser foot prevents skipped stitches and fabric bunching. Regularly check for wear and tear on both components. Understanding these mechanisms allows for precise control and optimal sewing results, contributing to a professional finish on every project.
Bobbin Winding and Insertion
Bobbin winding ensures a consistently full bobbin for smooth stitching. Follow the machine’s guide to wind the bobbin evenly, avoiding overfilling or loose winding. Correct bobbin insertion is critical; consult your manual for the specific orientation. An improperly inserted bobbin can cause tension issues and tangled threads.
Always use the correct bobbin type for your Toyota model. Regularly check the bobbin case for lint and debris, as buildup can affect stitch quality. Mastering these steps guarantees a reliable and consistent lower thread supply, essential for beautiful sewing.
Stitch Selection Dial
The stitch selection dial is your gateway to creative sewing! This dial allows you to choose from a variety of stitch patterns, including straight stitch, zigzag, and decorative options. Refer to your manual to understand each stitch’s purpose and recommended settings.
Experiment with different stitches on scrap fabric to familiarize yourself with their appearance and suitability for various projects. Ensure the dial is firmly set on your desired stitch before beginning to sew, preventing accidental stitch changes mid-seam.

Basic Operation and Setup
Master the fundamentals of operating your Toyota sewing machine, from initial threading to bobbin insertion and stitch selection for seamless projects.
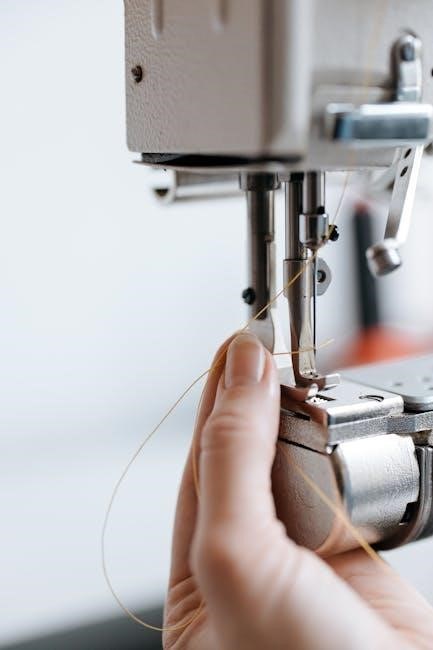
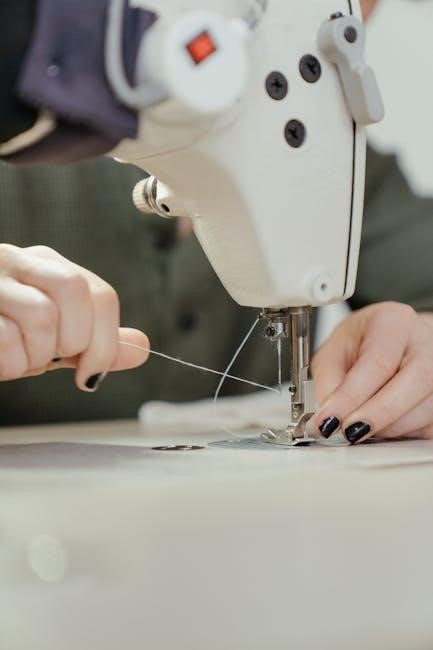
Threading the Machine
Proper threading is crucial for consistent stitch quality. Begin by raising the presser foot and the needle to its highest position. Guide the thread from the spool, through the tension discs – ensuring it seats firmly – and then down through the take-up lever.
Next, lead the thread through the guide on the needle bar and finally, thread the needle from front to back. Incorrect threading can cause skipped stitches or tension issues, so double-check each step against your machine’s diagram. A well-threaded machine is the foundation for successful sewing!
Winding the Bobbin
Begin bobbin winding by placing the thread spool on the spool pin. Guide the thread through the thread guide and then onto the bobbin. Secure the bobbin onto the bobbin winder spindle, ensuring it clicks into place.
Engage the bobbin winder by pushing the winder lever to the right. Gently press the foot pedal to start winding; the machine will automatically stop when the bobbin is full. Remove the bobbin and trim the thread end. A consistently wound bobbin ensures even stitching.
Inserting the Bobbin
To insert the bobbin, locate the bobbin case. Open the bobbin cover, typically found beneath the needle plate. Insert the wound bobbin into the bobbin case, ensuring the thread unwinds in the correct direction – usually clockwise or as indicated by a diagram on the machine.
Guide the thread through the tension spring and then through the slot. Close the bobbin cover securely. Properly inserted bobbin ensures smooth and consistent thread delivery during sewing, preventing issues like skipped stitches or thread bunching.
Selecting Stitch Patterns
Your Toyota sewing machine offers a variety of stitch patterns for diverse projects. Locate the stitch selection dial, usually featuring labeled options like straight stitch, zigzag, and decorative stitches. Rotate the dial to the desired stitch pattern. Refer to the user manual for a detailed illustration of each stitch and its recommended uses.
Some machines have stitch length and width controls, allowing customization. Experiment with different stitches to achieve desired effects. Always test the selected stitch on scrap fabric before starting your project to ensure optimal results.
Advanced Sewing Techniques
Elevate your sewing skills with techniques like stitch adjustments, specialized presser feet, and free-motion sewing for creative and precise results.
Adjusting Stitch Length and Width
Mastering stitch customization unlocks a world of sewing possibilities. Your Toyota sewing machine allows precise control over stitch length and width, influencing fabric strength and aesthetic appeal. A shorter stitch length is ideal for delicate fabrics and curves, ensuring durability and preventing puckering. Conversely, a longer stitch length suits heavier materials and quicker construction.
Width adjustments broaden or narrow the zigzag pattern, crucial for finishing raw edges and creating decorative stitches. Experiment with different settings on scrap fabric to understand their impact. Refer to your model’s manual for specific dial markings and recommended settings for various fabrics and techniques. Consistent practice yields professional-looking results!
Using Different Presser Feet
Expand your sewing capabilities with Toyota’s range of specialized presser feet! Each foot is designed for a specific task, enhancing precision and efficiency. The standard zig-zag foot handles most fabrics, while the zipper foot allows close stitching along zippers and cording. A buttonhole foot automates perfectly sized buttonholes, saving time and effort.
Explore additional feet like the rolled hem foot for delicate edging or the blind hem foot for invisible hems. Correct foot selection dramatically improves stitch quality and project outcomes. Consult your machine’s manual to identify compatible feet and proper installation techniques for optimal performance.
Zipper Foot Application
Achieve professional-looking zipper installations with the Toyota zipper foot! This foot snaps onto your presser foot holder, positioning the needle close to the zipper teeth. It’s crucial for both standard and invisible zippers, ensuring neat and even stitching.
Align the zipper teeth with the groove on the underside of the foot. Begin stitching close to the zipper coils, guiding the fabric gently. Adjust the needle position (left or right) for optimal results. Practice on scrap fabric first to master the technique and achieve a flawless finish. Remember to use a matching thread color!
Buttonhole Foot Usage
Create perfectly sized buttonholes effortlessly with your Toyota buttonhole foot! This specialized foot works in conjunction with your machine’s buttonhole settings. Ensure the correct buttonhole foot is attached and select the appropriate buttonhole style on your stitch selection dial.
Place your fabric under the presser foot, aligning the buttonhole placement mark with the foot’s guide. Lower the presser foot and begin stitching; the machine will automatically create the buttonhole outline. Follow your machine’s manual for specific buttonhole foot operation instructions for optimal results.
Free Motion Sewing
Unlock creative possibilities with free motion sewing! Disengage the feed dogs on your Toyota machine – typically via a lever at the back – allowing you to move the fabric freely under the needle. Use a darning foot for optimal gliding. Lower the feed dogs before attaching the darning foot.
Slowly turn the handwheel to control stitch length and direction, creating unique designs, quilting patterns, or embellishments. Practice on scrap fabric to master the technique. Remember to maintain a consistent hand speed for even stitches and beautiful results!
Maintenance and Troubleshooting
Ensure peak performance by regularly cleaning, oiling, and addressing common issues like thread jams or needle breakage. Proper care extends your machine’s life!
Cleaning Your Toyota Sewing Machine
Regular cleaning is vital for maintaining your Toyota sewing machine’s performance and longevity. Begin by disconnecting the power source. Use a soft brush to remove lint and dust from the bobbin area, feed dogs, and around the needle plate. A small vacuum cleaner with a brush attachment can also be helpful.
Wipe down the exterior surfaces with a slightly damp cloth. For stubborn grime, a small amount of sewing machine oil can be applied to a cloth and used to gently clean the affected areas. Never use water or harsh chemicals, as these can damage the machine’s components. Consistent cleaning prevents build-up and ensures smooth operation.
Oil Points and Lubrication
Proper lubrication ensures smooth operation and prevents wear on your Toyota sewing machine. Refer to your model’s specific diagram for designated oil points – typically found around the bobbin area, hook assembly, and motor. Use only sewing machine oil; other lubricants can cause damage;
Apply a few drops of oil to each point, and then manually turn the handwheel to distribute the oil evenly. Avoid over-oiling, as excess oil can attract dust and lint. Lubricate regularly, approximately every few months with normal use, or more frequently if the machine sounds stiff or noisy.
Common Problems and Solutions
Encountering issues? Thread jamming is frequent; re-thread the machine carefully, ensuring the presser foot is up and the thread path is clear. Needle breakage often stems from using the wrong needle type for the fabric or a bent needle – replace it immediately.
If the machine runs roughly, cleaning lint buildup is crucial. For skipped stitches, check needle insertion and thread tension. Consult your manual for detailed troubleshooting specific to your Toyota model. Regular maintenance prevents many problems!
Thread Jamming Issues
Persistent thread jams usually indicate improper threading. Double-check the entire thread path, from spool to needle, ensuring the thread is securely seated in each guide and tension disc. A common culprit is failing to raise the presser foot before threading – this reduces tension.
Also, verify you’re using the correct thread type and weight for your fabric. Lint buildup can contribute; clean the bobbin area and thread path regularly. If jams persist, try re-threading with a new spool of thread.
Needle Breakage Causes
Frequent needle breakage often stems from using the wrong needle type or size for the fabric. Delicate fabrics require finer needles, while heavier materials need stronger ones. Ensure the needle is fully inserted and correctly oriented – a blunt or bent needle is also a prime suspect.
Pulling or pushing the fabric through the machine can cause breakage. Let the feed dogs do the work! Incorrect threading or excessive thread tension can also strain the needle. Regularly inspect your needle for damage and replace it as needed.
Belt Replacement Procedures
Replacing the belt typically involves accessing the rear of the machine, often by removing a cover plate secured with screws. Carefully note the belt’s routing before removal – a photograph is helpful! Gently ease the old belt off the motor and flywheel pulleys.
Install the new belt, ensuring it’s seated correctly in the grooves of both pulleys. Verify proper tension; it should have slight give but not be excessively loose. Reattach the cover plate, and test the machine to confirm smooth operation.

Safety Precautions
Always disconnect the power before maintenance. Keep fingers clear of the needle, and never sew over pins. Use caution with electrical components.
General Safety Guidelines
Prioritize safety when operating your Toyota sewing machine. Always maintain a clean and well-lit workspace, free from obstructions. Never force the fabric; let the machine do the work. Keep children and pets away during operation. Regularly inspect the power cord for damage, and avoid using it if frayed.
Ensure the machine is unplugged during threading, bobbin changes, or any maintenance. Avoid reaching under the presser foot while the machine is running. Use the correct needle type for your fabric to prevent breakage and potential injury. Familiarize yourself with all safety features before use, and always follow the manufacturer’s instructions.
Electrical Safety
To ensure safe operation, always verify your Toyota sewing machine’s voltage matches your household supply. Never operate the machine with a damaged power cord or plug. Avoid using extension cords if possible; if necessary, use a heavy-duty cord rated for the machine’s amperage.
Always unplug the machine before cleaning, changing parts, or performing any maintenance. Do not expose the machine to water or other liquids. If the machine malfunctions or emits unusual smells, immediately unplug it and consult a qualified technician. Never attempt to repair electrical components yourself.

Resources and Support
Access Toyota’s official website for manuals and FAQs. Explore online forums for community support and troubleshooting. Find genuine parts at ToyotaPartsDeal.com for repairs.
Toyota Sewing Machine Official Website
The official Toyota Sewing Machine website serves as a primary hub for owners seeking detailed product information, downloadable manuals, and frequently asked questions. Users can often register their machines for warranty purposes and access exclusive content.
This online resource provides a wealth of knowledge, including troubleshooting guides, stitch pattern references, and accessory information. Furthermore, Toyota frequently updates the site with new tutorials and support materials, ensuring users have the latest resources at their fingertips.
It’s a valuable starting point for resolving common issues and maximizing your sewing experience.
Online Forums and Communities
Engage with fellow Toyota sewing machine enthusiasts through dedicated online forums and communities. These platforms offer a collaborative space to share tips, ask questions, and troubleshoot issues. Experienced users often provide valuable insights and solutions to common problems.
You can find advice on specific models, advanced techniques, and even modifications. These communities are excellent resources for learning beyond the user manual, discovering creative projects, and connecting with a supportive network of sewing experts.
Sharing experiences and seeking guidance can greatly enhance your sewing journey.
Finding Replacement Parts (ToyotaPartsDeal.com)
Ensure the longevity of your Toyota sewing machine by sourcing genuine replacement parts from reputable suppliers like ToyotaPartsDeal.com. This online store specializes in authentic OEM (Original Equipment Manufacturer) parts, guaranteeing compatibility and quality.
Finding the correct components is crucial for maintaining optimal performance and avoiding potential issues. ToyotaPartsDeal;com offers a user-friendly interface and fast shipping, simplifying the process of acquiring needed parts.
Investing in genuine parts safeguards your machine and preserves its original functionality, extending its lifespan considerably.

Toyota FJ Cruiser Connection (Historical Context)
Interestingly, Toyota utilized feedback from online forums, like those surrounding the FJ Cruiser, to refine engineering and address user concerns proactively.
Early Toyota Engineering Feedback Loops
Toyota demonstrated a commitment to incorporating user input during the FJ Cruiser’s development, actively monitoring online forums for valuable insights. A notable example involved a community-created “hack” to simultaneously enable the rear differential lock and ATRAC system. Recognizing the ingenuity and demand, Toyota integrated this functionality into the vehicle’s ECU programming in late 2006.
This proactive approach highlights Toyota’s willingness to learn from its customer base and improve its products based on real-world experiences, showcasing a unique feedback loop between engineers and owners.
Transfer Case and ADD System Considerations
Discussions within FJ Cruiser forums frequently centered around the Automatic Disconnecting Differential (ADD) system and the importance of regular transfer case operation. Owners speculated that infrequent use could lead to the ADD system seizing or hesitating due to lack of lubrication and movement of the sliding sleeve.
Concerns were raised regarding whether the majority of ADD issues stemmed from electrical malfunctions or mechanical problems, prompting preventative maintenance recommendations like monthly 4H engagement to exercise the system.
Community and Owner Forums
The vibrant FJ Cruiser online community proved invaluable, with owners actively sharing knowledge, modifications, and troubleshooting tips. Forums served as a platform for discussing everything from ADD system issues to ECU reprogramming for enhanced functionality.
Members like “Hayden” became well-known contributors, documenting builds and offering guidance to newcomers. Toyota reportedly monitored these forums, incorporating user feedback to improve the FJ Cruiser’s design and address common concerns, demonstrating a unique engineering feedback loop.

Future Toyota Developments
Speculation surrounds potential electric or hybrid FJ Cruiser models, mirroring industry trends. Toyota’s future plans remain unconfirmed, fueling excitement among enthusiasts and owners.
Speculation on New Models (EV/Hybrid)
Rumors persistently circulate regarding a potential electric or hybrid FJ Cruiser revival, or a Land Cruiser variant styled with FJ design cues. Discussions online, particularly within owner forums, frequently explore these possibilities. While Toyota has not officially announced any such plans as of July 23, 2025, the strong community interest and the automotive industry’s shift towards electrification suggest it’s a viable direction.
Speculation includes a 3.5L hybrid powertrain option, blending traditional Toyota reliability with improved fuel efficiency. Ultimately, concrete details remain elusive until Toyota releases official model data, leaving enthusiasts eagerly anticipating future announcements.